Interior designers often remind us not to overlook what's beneath our feet when we decorate a room. The flooring you choose has powerful impact, particularly if you are following the current trend of laying down bold, interesting statement rugs to give a space a spark of life.
You've heard of statement jewelry? Maybe you even wear a chunky bauble to dress up your T-shirts and cardigan sets. A statement rug performs the same accessorizing task in a room: It elevates the basic to something special. A statement rug should change the feel of a space and push it past a prescribed look. You can give a traditional room a mod vibe by adding a wooly shag to the floor, for example. With its pink walls and feminine flounces on the chairs, this dining room could feel girly and trite. But the exotic black-and-white pattern of the rug is an unexpectedly eclectic touch, it and gives the space a worldly edge.
Style Notes
living room
It doesn't have to be large or sparkly, but a statement rug should have presence -- an unusual color combination, a striking pattern, or an interesting texture. You already have other elements in the space, such as upholstery, window treatments, and artwork, so the rug has to claim its own portion of attention. In this living room, there is a lot of color and pattern happening at once. Yet the statement rug still stands out. Its vintage feel and bright colors pop off the large neutral rug underneath, and the long fringe is a silky counterpoint to the rough sisal.
How to Use Statement Rugs in Your Home
Perfectly Balanced
Layer a rug of unusual shape over a standard rug to add a component of visual interest. Try it under a seating group where you can overlap an amorphous shape, such as a faux-animal skin, over a typical rectangle. It makes a room feel comfortably aged over time.
When color and pattern is limited, such as in a utilitarian kitchen or formal dining room, unroll a powerfully bold pattern, such as wide awning stripes or a boisterous floral, to enliven the space. New cabinet hardware or bright dishware might follow.
Best Colors to Use in a Small Bathroom - Home Decorating & Painting Advice
Many people wish they had a bigger bathroom, but usually don't have the space or time to make their bathroom larger. A Bigger Bathroom with Color A fresh coat of paint is a simple way to make a bathroom appear bigger even if it's small. Small bathroom ideas come in many shapes and sizes, allowing you to amplify your bathroom and make it your own. Here are a few paint color ideas that are best for enlarging small bathrooms. {^widget|(widget_displayname)CTA+Button|(gtmt)cta|(target)_top|(url)https%3a%2f%2fwww.glidden.com%2finspiration%2frooms-projects%2fbathrooms|(color)d6414d|(name)CtaButton|(label)Find+More+Bathroom+Paint+Color+Ideas|(width)|(height)^} Some of the best colors for small bathrooms are bright and light colors. These colors create the appearance of space by allowing natural and artificial light to keep spaces feeling as bright as possible. Cow's Milk is one of the most common white interior paint colors for small bathrooms. White is the lightest possible color and is most reflective of light, giving your bathroom a timeless and clean look. {^widget|(widget_displayname)CTA+Button|(gtmt)cta|(target)_top|(url)https%3a%2f%2fwww.homedepot.com%2fp%2fPPG-TIMELESS-1-gal-PPG1053-1-Cow-s-Milk-Satin-Interior-One-Coat-Paint-with-Primer-PPG1053-1T-01SA%2f310117584|(color)d6414d|(name)CtaButton|(label)Buy+Cow%27s+Milk+at+The+Home+Depot|(width)|(height)^} Aside from white paint colors, there are many other bathroom colors to choose from. A pale blue or green color like Lime Spritz compliments a bathroom for a cool, and relaxed look. A soft yellow gives off a warm and bright ambiance, mirroring the appearance of sunlight coming in through windows. Lighter neutrals, like warm or cool grays, also give off a similar effect. {^widget|(widget_displayname)CTA+Button|(gtmt)cta|(target)_top|(url)https%3a%2f%2fwww.homedepot.com%2fp%2fGlidden-Essentials-1-gal-PPG1121-2-Lime-Spritz-Semi-Gloss-Interior-Paint-PPG1121-2E-01SG%2f310124450|(color)d6414d|(name)CtaButton|(label)Get+Lime+Spritz+at+The+Home+Depot|(width)|(height)^} The Power of Accent Walls Accent walls are a creative way to integrate multiple bathroom colors. Brighter colors, such as light yellow-greens, bright yellows, or even vibrant teal colors all can make a small bathroom appear bigger used separately. It's not advised to combine two or more light colors because it may overwhelm the space. A bright color works best as an accent wall with white walls or lighter versions of that color. For example, a bold green wall accentuates a paler green wall in a bathroom. Paint is a simple solution to make your small bathroom appear much bigger than it is. Light colors and bright colors are some of the best small bathroom colors, and choosing the right colors can create the appearance of a larger and more enjoyable space. {^widget|(widget_displayname)CTA+Button|(gtmt)cta|(gtmd1)Find+The+Right+Colors+For+Your+Bathroom|(target)_top|(url)%2fcolors|(color)d6414d|(gtmd2)Green|(name)CtaButton|(label)Find+The+Right+Colors+For+Your+Bathroom|(width)|(height)^}
Best Colors to Use in a Small Bathroom
Many people wish they had a bigger bathroom, but usually don't have the space or time to make their bathroom larger. A Bigger Bathroom with Color A fresh coat of paint is a simple way to make a bathroom appear bigger even if it's small. Small bathroom ideas come in many shapes and sizes, allowing you to amplify your bathroom and make it your own. Here are a few paint color ideas that are best for enlarging small bathrooms.
Some of the best colors for small bathrooms are bright and light colors. These colors create the appearance of space by allowing natural and artificial light to keep spaces feeling as bright as possible. Cow's Milk is one of the most common white interior paint colors for small bathrooms. White is the lightest possible color and is most reflective of light, giving your bathroom a timeless and clean look.
Aside from white paint colors, there are many other bathroom colors to choose from. A pale blue or green color like Lime Spritz compliments a bathroom for a cool, and relaxed look. A soft yellow gives off a warm and bright ambiance, mirroring the appearance of sunlight coming in through windows. Lighter neutrals, like warm or cool grays, also give off a similar effect.
The Power of Accent Walls Accent walls are a creative way to integrate multiple bathroom colors. Brighter colors, such as light yellow-greens, bright yellows, or even vibrant teal colors all can make a small bathroom appear bigger used separately. It's not advised to combine two or more light colors because it may overwhelm the space. A bright color works best as an accent wall with white walls or lighter versions of that color. For example, a bold green wall accentuates a paler green wall in a bathroom.
Paint is a simple solution to make your small bathroom appear much bigger than it is. Light colors and bright colors are some of the best small bathroom colors, and choosing the right colors can create the appearance of a larger and more enjoyable space.
The bathroom is often an after-thought when people plan out their dream home, with it being relegated to just another functional area where you spend an hour or so a day. But the bathroom area is more important than this, and hence it should be planned out and designed accordingly.
The bathroom in your tiny house can achieve everything you want it to do, even when space is very limited – you just have to be smart and careful with how you use the available space.
When you buy through links on our site, we may earn an affiliate commission. As an Amazon Associate I earn from qualifying purchases.
Tiny House Bathroom
Did you know that many professional tiny house builders design the whole house around the bathroom? It's the place where you spend the least amount of time, but it's critical to the overall design of a tiny house and to your wellbeing. The layout of the bathroom will determine where the plumbing goes, the types of materials you choose, and whether or not you can fit a tiny bathtub or not. Not everything needs to be square in a tiny house bathroom. Fixtures, storage, and sinks that fit into corners can help you use every square inch of space.
Tiny house bathrooms pack a lot of style into a small space and it's important to maximize every square inch. Tiny house bathroom layouts can be narrow and rectangular or a small square where everything is in one space. Some layouts don't even include a sink, with the assumption being that the tiny house owners will use the sink in the kitchen – this is especially the case for smaller (20' or shorter) tiny houses. Some longer tiny house bathrooms become multipurpose spaces and owners put the washing machine in an impromptu 'utility room' within the small space.
Tiny House Toilets
You won't be able to use a conventional toilet in a tiny house. Many tiny house toilets are similar to the style you'd see in an RV. They are more compact and don't have a large water tank. The toilet can even be in the same space as the shower if the drain is in the right spot on the floor. One of the best tiny house bathroom ideas for living off-grid is to use a composting toilet. These are very popular because they don't require water to flush and can be easily cleaned. Most tiny house toilets are setup either next to the shower or across from it depending on the layout.
Composting toilets can cost anywhere from $200 to over $1,000 and they essentiallycreate compost. This is because the liquids (urine) that go into the toilet are mixed with the solids (i.e. poo) and a carbon additive (such as sawdust), which triggers off a microorganism process that ultimately creates disposable compost. This might sound like a weird – and smelly – idea, but it is fairly common and there are no smells due to the negative pressure that the composting toilets work under. The Nature's Head Composting Toilet below is the most popular type of composting toilets among tiny house enthusiasts, costing around $1000 new. You can learn more about toilet options when your house is off-grid in our specific and more detailed post (as well as our overview of the best composting toilets for every budget).
Nature's Head Self Contained Composting Toilet with Close Quarters Spider Handle Design
No one – and I mean no one – will beat my customer service and individual support
Easy to install by any reasonably handy person.
Absolutely No Odor. No Maintenance. 5 Year Warranty.
Huge Capacity. 2 people using full time will empty every 4-6 weeks. Easy empty in 5 minutes.
A vast improvement over older composting toilet designs. This one works!
Bathroom Sinks And Faucets
If you decide to use a separate sink for your tiny house bathroom, there are many great low-profile options on the market. Below is an example of an inexpensive sink on Amazon which would be the perfect space-saving solution. Because it's narrow and shallow, it doesn't take up too much space. We mentioned above that you could skip the bathroom sink altogether. This gives you more room for other storagefor towels and laundry or even a tiny house tub. Another alternative is to use a combined toilet-sink: these are starting to grow in popularity and there are actual faucets on top of the toilet where you can wash your hands, a nice space-saving idea – even if some people will be creeped out by the idea of washing their hands in the toilet! But honestly, it's actuallyon the toilet 🙂
This is actually also a great water saver as the 'dirty' water from washing is collected in the toilet tank and then re-used for the next flush. While special toilets with included sinks are often quite expensive as they are often priced as 'designer pieces', you can get a very inexpensive separate toilet sink here on Amazon. This great space and energy saver can easily be fitted on most toilet sizes.
Sink Twice for toilet tanks measuring 15.25″ – 16.8″ (measured with lid off)
Compatible with Tanks measuring 14 – 16.8 as measured with the lid off and with larger tanks with the Sink Twice Expansion kit (sold separately)
Touchless Automated Handwashing
Excellent Water, Space and Money Saver
Large Soap Dish Is Perfect for Dispensers
Loctite Fun-Tak Mounting Putty Tabs can be helpful in affixing to some toilets (sold by a separate seller separate
Alternatively, one of the best tiny house bathroom ideas for faucets is to use ones that have a little more height. They give you space to wash your hands and face. Additionally, some faucets are designed for small spaces that have more attractive pipes and parts in case they need to be visible. You can find attractive faucet designs built for small spaces over at Amazon or at Pinterest.
Showers, Bathtubs And Tiles
Often the most challenging part of designing a tiny house bathroom is deciding on showers or tubs. It's typically the largest bathroom item in a regular bathroom, which creates unique challenges when you work in a tiny space. A standard sized shower surround is usually too large for a tiny house. One option is to buy shower fixtures and then tile the shower area. Get a shower curtain to keep the rest of the bathroom dry. There are also small glass doors that can be used to separate the shower from the rest of the bathroom.
Bathtubs are even more challenging than showers and most tiny house owners forgo them altogether. But if you're insistent on getting dunked, there are tiny tubs for tiny bathrooms. Choose from tiny ones designed to fit in the corner, deep ones, or make your own. These can be especially helpful for parents of small children who take baths instead of showers. Alternatively, consider getting a portable or foldable bath for small children, such as the this one on Amazon. Whilst not the cheapest if you also have to pay for a full shower (and the rest of the bathroom!), a foldable bath that you can hide away once it's finished with can be a nifty idea.
Portable Foldable Bathtub, Separate Family Bathroom SPA Tub, Soaking Standing Bath Tub for Shower Stall, Efficient maintenance of temperature, Ideal for Hot bath ice bath
Built-In pearl insulation layer Design: WEY&FLY folding bathtub, built-in EPE insulation layer, we can better maintain water temperature compared with ordinary folding bathtub, Warm time up to 120 min.
Bottom of tub is cushioned with a insulation layer, soft and better to maintain water temperature.
Sufficient Space: about 29.7 in (75.5 cm) in diameter, you can stretch freely in the water, providing plenty of space for adults and children to enjoy bath time.
High-quality materials: safe and non-toxic PVC materials, in line with the quantity test standards, environmentally friendly and durable, comfortable at an altitude – do not worry about tripping when using, nor will you feel claustrophobia.
Easy to store and use, more accessories: This foldable, portable bathtub can be used indoors and outdoor
The nice thing about tiled bathrooms is that you can use it to create a waterproof surface virtually anywhere. This comes in handy for building custom tubs and showers in a tiny house. They can cover the ceiling, walls, and even the floor.
Tiny House Vanity Ideas
Storage in a tiny house is about as rare as finding an affordable flat in NYC. But creativity goes a long way. If you find a narrow enough vanity, look for ones with drawers, shelves, or cabinet doors. Look for one that can also be a storage space. One of the best tiny house bathroom ideas is to pair a low profile sink with a low profile vanity, before adding a touch of your style with fixtures, paint, wood stain, or even tiles with different colors and patterns. Additionally, there are corner vanities to help you maximize every inch of your bathroom.
The All-Important Bathroom Mirror
Just because it's small doesn't mean it needs to be bland. Dress up a bathroom mirrorwith a gorgeous frame, mini shelves, or even get one with hidden storage. You can get a medicine cabinet to pull double duty for storage and aesthetics in your tiny house as well. One of the unique aspects of tiny house living is all the hidden compartments. Put a mirror on the bathroom door to save space. You could also put one in your shower, but that may be a little more challenging. Alternatively, keep it simple and just add decorationaround the bathroom mirror and you will end up with an understated yet stylish bathroom and mirror surround:
Bathroom Storage Ideas
There's not a lot of storage space in a tiny house bathroom. But there are some unique ways to store the most important bathroom items. A wall-mounted toothbrush holder is a great way to keep your toothbrush off the counter and out of the way. It also suspends the toothbrush so it can dry more easily after each use. You can also get a wall-mounted soap holder if you prefer liquid soap or use small bar soaps that you store on the sink.
Aside from suspending everything in the bathroom from the wall, another option is to create a narrow shelf from the floor to ceiling and build it into the wall. You can store your towels, toiletries, and makeup and leverage nooks and crannies that might otherwise be wasted space.
Linkidea Wall Mount Toothbrush Holder for Bathroom, Shower, Stainless Steel Tooth Brush Stand for Electric Toothbrush, Toothpaste, Razor, Self Adhesive Wallmount / Countertop 3 Slots Organizer
Toothbrush holder with self-adhesive hanger sticker, easily install on wall or mirror and optional as a stand on the washstand.
Bigger size main slot in middle, for an electric toothbrush, toothpaste, razor, shaver, comb, cleanser, 2 slots separated on both ends for a toothbrush.
Tooth brush stand can be used in bathroom, shower, showroom, kitchen, RV, camper, trailer and many small space as organizer.
Ventilation Toothbrush Stand Dimensions: 43/4 Long, 23/8 Width, 4 High.
Hand Soap Dispenser Wall Mount, SWAWIS Glass Soap Dispenser Pump Bottle for Kitchen & Bathroom, Dish Soap Dispenser with Stainless Steel Pump, Dispenser Pump Bottle for Lotions, Liquid Soaps
【NO LEAKS, NO DRIPPING】 Our soap dispenser pump head contain leak-proof gaskets to prevent liquid leakage, so you dont have to worry about liquid soap leaking. The curved tip design ensures that no liquid is wasted. The stainless steel pump head is not easy to rust.
【HIGH QUALITY】 Durable, thick, lead-free glass bottle with a corrosion-resistant stainless steel dispenser top. The bottle body has a brushed surface design, long-lasting luster, dirt and scratch resistance, easy to clean, and long service life.
【UTILITY & DECOR】The glass pump bottle capacity is 6.8oz, and the size is 2.8×7×4.3 inches. The reusable transparent glass bottle allows you to see the content clearly and remind you to add content. No need to disassemble , just pull out the detachable pump head. Elegant design can add a lot to your kitchen and bathroom decoration.
【WALL-MOUNTED INSTALLATION】Just a few simple steps, you can easily install the wall-mounted soap dispenser. Fixing it to the wall can save space in the kitchen and bathroom and make your house look cleaner.
【MULTI-PURPOSE】 Use as a hand soap dispenser or shower soap dispenser in your bathroom. It can also be used in lotions, shampoos, essential oils, and even as a dish soap dispenser on the kitchen sink.
While you are here, also check out our great guide on the tiny house water and sewage guide and our tiny house kitchen guide or find an overview of all our tiny house posts here.
Tiny House Bathroom Layout Ideas (Photos and Videos)
Here are some photos and videos of tiny house bathrooms and toilet that you can get inspiration from while planning or building your tiny house (click on the photos to zoom in):
Learn how to paint oak cabinets gray (or cool grayish color like ours)
Does your house have a lot of old, construction-grade oak in it? Our house was built in 1992, and oak Merillat cabinets and molding really seemed to be the standard. One thing we know is that getting rid of the golden oak color in your home can really help update your space.
In the past, we have gone over how we have painted other oak items in our home. From our fireplace mantel to doors in our basement, we have used a similar technique to help get rid of the oak color. We have even done our kitchen cabinets and all the molding in our upstairs following the steps described below.
The biggest difference is that all of those above DIY home projects turned our oak into modern white counterparts and this time we wanted to create a nice blue-gray cabinet for our bathroom vanity.
*Disclosure: I only recommend products I would use myself and all opinions expressed here are our own. This post may contain affiliate links that at no additional cost to you, I may earn a small commission. Read full privacy policy here.
Tips and tricks to painting bathroom vanity gray
Here are some questions that we hope to answer through this DIY bathroom vanity tutorial
How to paint cabinets without sanding?
What kind of paint to use on bath vanity?
How cheaply can these bathroom vanity makeover be done?
Can you just replace the bathroom vanity top? What are your budget-friendly vanity top options?
How to easily add hardware?
Here is a video explaining some of our bathroom cabinet painting steps!
Redoing a bathroom can be budget-friendly
The good news is that painting a bathroom vanity can go pretty quickly and can be pretty inexpensive. We ended up doing more to this small bathroom (and another one in the basement) to help completely modernize it. However, simply getting rid of the oak cabinets through our easy painting technique is a great first step and one that you will hopefully be confident to take on after reading this.
Make sure to ask any questions at the end (we love getting comments from our readers and helping out DIY nuts like ourselves). Sometimes, the only thing holding you back from completing a DIY project is just fear. I am telling you to just go for it. Paint can always be painted over.
Do you need help deciding what color of paint to use for your cabinets or walls?
We recently just tried Samplize and it totally beats having to buy individual paint samples. These 12″ x 12″ samples will get shipped directly to you and save the hassle of clean-up (we loved that). Check out the brands you can get here. You can also check out our post, see our review and hopefully get the answers to those frequently asked Samplize questions.
How to paint cabinets without sanding (or I guess I should light sanding)?
Don't worry the sanding part is really not bad and will take you only a few seconds which we will explain in the step-by-step tutorial.
Now our plan still involves seeing the grain a little through the paint. It really doesn't bother us, therefore it is really not worth the time to use something like these fillers and oil-based primer that I see other DIY bloggers or pro painters recommend.
*Using the right primer one of the most important things. We normally only use this primer for all of the projects, so I cannot attest to other latex primers. This is also not an affiliate link as we just love using SW products. I have also read about people using oil-based primers with a lot of success. However, we have had great success with latex-based primers and paints and really have not had the need to stink up the whole house!
If you are looking for a kitchen cabinet makeover. See how we remodeled our kitchen cabinets using a similar technique.
We also recently repainted some of our white painted kitchen cabinets using a different type of paint. We will never use any other paint again to paint cabinets!
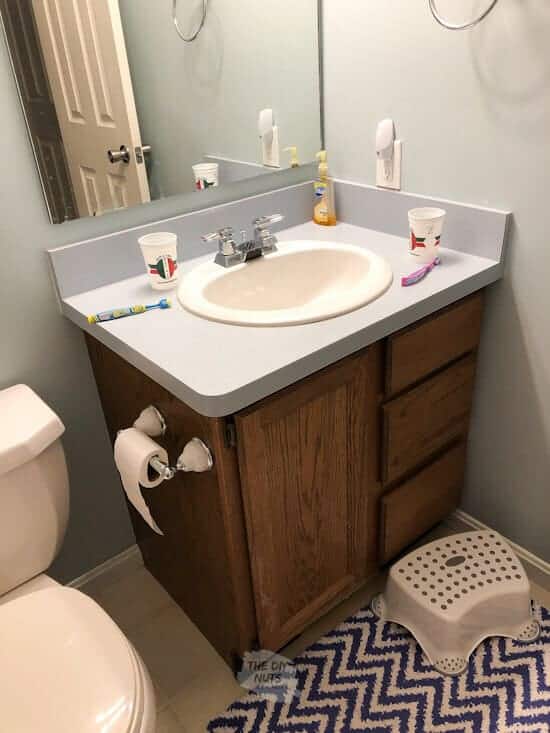
Our "before" bathroom
Before our budget bathroom makeover
Tutorial on how to painting oak bathroom cabinets
Just one more view of the ugly and dated bathroom vanity!
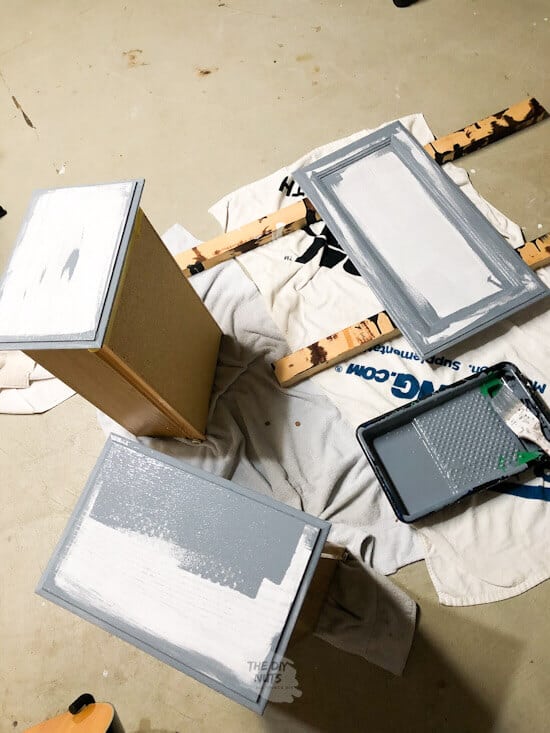
1. Take all doors and drawers out. Take off hardware (hinges as well). Place in a bag and label clearly. You also want to put a piece of painter's tape inside the drawers labeling where they came from.
2. Lightly sand with fine sandpaper to rough up the gloss on our current surface. I think this always allows the primer to stick a little better.
3. Use a deglossing agent with a rag to wipe down cabinet, drawers and doors. Make sure to completely clean all parts. You do not want anything greasy leftover.
4. Tape any spots that you feel you will not be able to trim well with a brush. I only taped along the wall where the cabinet and wall meet. Use your fingernail or an old credit card to really push the tape on.
Tape drawer fronts on the back so that you can prime and paint the backs of the drawers easily.
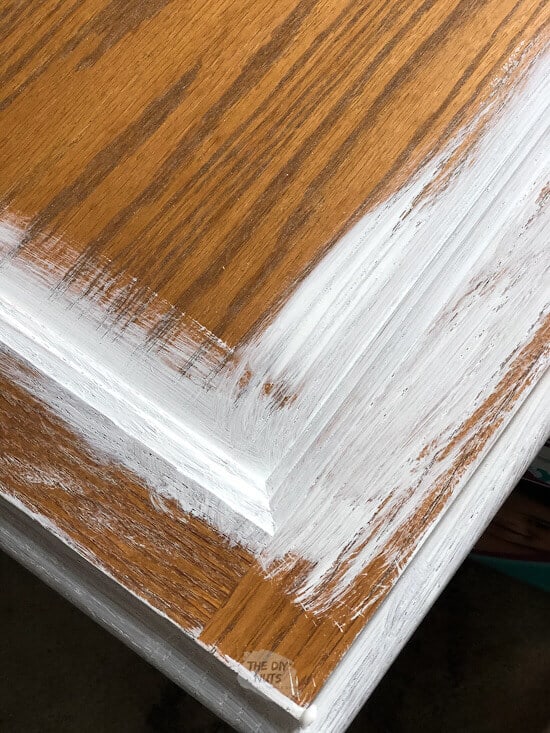
5. Use a primer with a brush first in areas that can't be rolled. The biggest thing is to make sure you cover everything, while not having drips.
If your cabinet doors or like our standard construction grade cabinet from the 1990's make sure to not have extra drips in the grooves or ridges.
6. Once you complete the door, just go back and check to make sure that you give a quick brush to any spots that appear to have too much. Continue to also prime the spots a roller could not go on the cabinet frame back in the bathroom.
7. The large flat areas can have primer applied with a small foam roller. The same principle applies to full coverage while making sure not to have drips.
8. Let your primer dry. The front and back of the front of the drawers should be able to be painted/primed at the same time because you should be able to prop them up. Once the primer is dry, you will have to flip the door over and do the backside.
***Tip: Saving your brush and roller in a Ziploc bag is a great tip so that you can save the hassle of having to wash your brush every time. ***
9. Primer should be dry in a few hours (I believe Sherwin Williams says 4 hours). However, I also call myself the naptime painter so I always paint in steps during naptimes and just continue the next day.
Therefore, I did the back of the door later that day, but waited to start with my semi-gloss latex enamel paint until the next day.
I am normally a Sherwin Williams paint girl (still am), but was able to score this Behr latex enamel for pretty cheap and I thought about giving it a try. Stayed tuned for my full review in another post soon.
If you do not want to use this inexpensive latex enamel, then I recommend using Sherwin Williams Proclassic line. That is what I have used for all other trim and cabinet painting in our house. You would be surprised at how long our kitchen cabinets and moldings have held up with 3 children banging into them.
However, the price is the main reason I decided to give this Behr a try. I was able to get a gallon for around $30 because I had a coupon and they were already on sale. I will have to update this post next year with how the cabinets are holding up with this brand of paint.
10. Following the same brush and roller procedure, apply thelatex enamel paint. Let dry and then add a second coat to the drawers, doors and cabinet base. If you think you need a third coat, feel free.
11. Make sure that you evenly paint the sides and all parts of the bathroom cabinet. It is very easy to miss a spot. Looking at your cabinet and vanity parts from all angles, helps you see if you missed any spots.
12. Repeat the steps with the gray paint at least twice. You may decide to add a third coat depending on how thickly you applied the paint.
We will talk more about how we replaced the old laminate counters a future post. But once the counter was completely redone we were able to complete the following makeover ideas.
Add new hardware to complete your bathroom vanity cabinet makeover
Before, putting our brass hinges back on, I used silver spray paint to update the look and match our hardware. You can also purchase new brushed nickel hinges (of the finish of your choice) pretty cheaply.
We let our doors and drawers cure for a few days. Once we felt the paint was cured enough, we decided to add our cabinet pulls. I absolutely love our larger pulls we added. Normally, we do not pick larger hardware but thought this was a great way to cheaply modernize our bathroom vanity.
Tip! Use an old piece of cardboard so that you can stick the screws in so it is easier to spray the heads with the silver spray paint.
I purchased these large pulls from Amazon and while they are only plated brushed nickel, I could not beat the price for our kid's bathroom makeover. They came very well packaged with limited scratches or blemishes. I think ordering 5 this size from Amazon was cheaper than anything I could have found at a big box store.
Also, don't forget to check out World Market for different hardware options. I love using their hardware on our refurbished furniture projects.
You still should be very careful, as it can take paint 30 days or so to really cure or harden. After about 5 days, I also added plastic drawer and door protectors on the inside to limit the banging of the drawers.
How much did the bathroom cabinet makeover cost?
If you are like us, then you only had to buy paint and hardware. If you assume that you already have brushes, rollers, etc. then this bathroom vanity makeover was done for under $75 and I have a lot primer, paint & deglosser leftover to use for future projects.
What about the bathroom countertops and sink?
So we could have left the blue laminate countertop, cleaned it up a little and been all done. You can see how we only painted the bathroom vanity in the basement. We didn't think we really needed to do much more to update the small space.
At the time, it wasn't worth spending more money on bathroom upgrades (even if they are DIY projects). I still love the look of this freshly painted bathroom vanity!
Decide on the type of countertop and sink
However, the upstairs bathroom was a little different. This bathroom vanity painting project started the snowball effect into more DIY bathroom projects. This tends to be a trend around here.
Read more about how a new screened-in porch turned into building a corner shelf and then into a fireplace mantel painting project.
Another note about replacing the countertops is that premade countertops are not that expensive, so we figured we would try to completely update the vanity.
I was also contemplating painting our counters with this Rustoleum Countertop Transformations. However, again kids can do damage, and I just didn't know how well they would hold up and the price was very similar to just getting a whole new countertop.
We decided to buy a premade countertop with sink from Home Depot. We ran into a little bit of trouble in our choices because we knew that we needed the backsplash pieces to go on the back and side. Did I mention this is our kids' bathroom? We knew that we could not have a small lip like a lot of the models have.
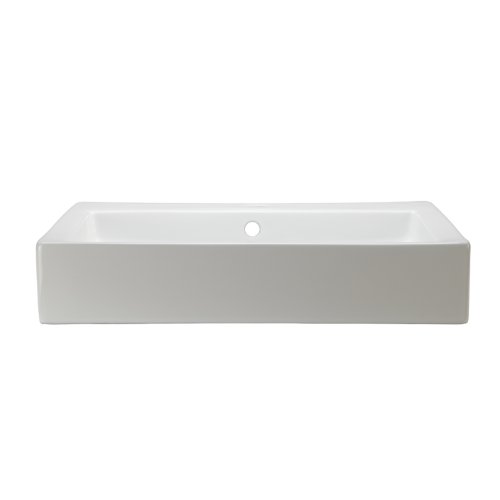
I really just wanted to purchase a white cultured marble rectangular sink shape (Home Depot) and countertop. Not only are they inexpensive, but I thought it would work to help brighten a small space.
However, we could not find one that we seemed would work for our corner bathroom vanity cabinet. Most of these simple and inexpensive white sink tops (Amazon) that were interested in only had a small lip on the back.
If you don't have kids or you have a stand-alone vanity that you have painted, the two link options from Home Depot and Amazon may be a great choice for you.
Kid-friendly sink top and protection (we hope)!
Since this bathroom will mainly be used by our children, we went with this countertop and sink and ordered an extra side backsplash for the corner.
Soon you will be able to read more about how we removed the old countertop and sink and add this one to our painted cabinets in this post.
We also had to purchase a new faucet. We went with a highly rated, but under $100 modern looking Kohler faucet in brushed nickel. I love the new trend of gold hardware, but we don't have any in other rooms, so we just went with the safe brushed nickel.
Here is a recap of how to redo a bathroom vanity cheaply
Paint vanity cabinets (it isn't as hard or as inexpensive as you would think).
Add new hardware.
Replace countertops, sink and faucet (if you want).
Frame out old construction mirror, purchase a new one or leave your current one.
Consider painting old light fixtures or there are so many inexpensive ones out there that you buy.
Add some new fun accessories or repurpose what you have.
If you need to cover up spot inside the inside of the cabinet, using a fun shelf liner can really add some fun inside your cabinets. Not to mention, extra protection from future mishaps. I know we need that with our tribe.
Don't forget about the inside of your newly painted cabinets
Funny story about our shelf liner. I meant to order contact paper for a file cabinet makeover that I will be doing soon. I love this pattern (at the time I thought paper). However, it was a textured shelf liner…
I should totally have read the whole product description. For the price, I knew that would use it somewhere else and it wasn't worth returning. Inside our bathroom vanity was the perfect place!
One last before picture of these ugly oak cabinets
Yes, I am so happy to share with you the updated bathroom look.
So drumroll…
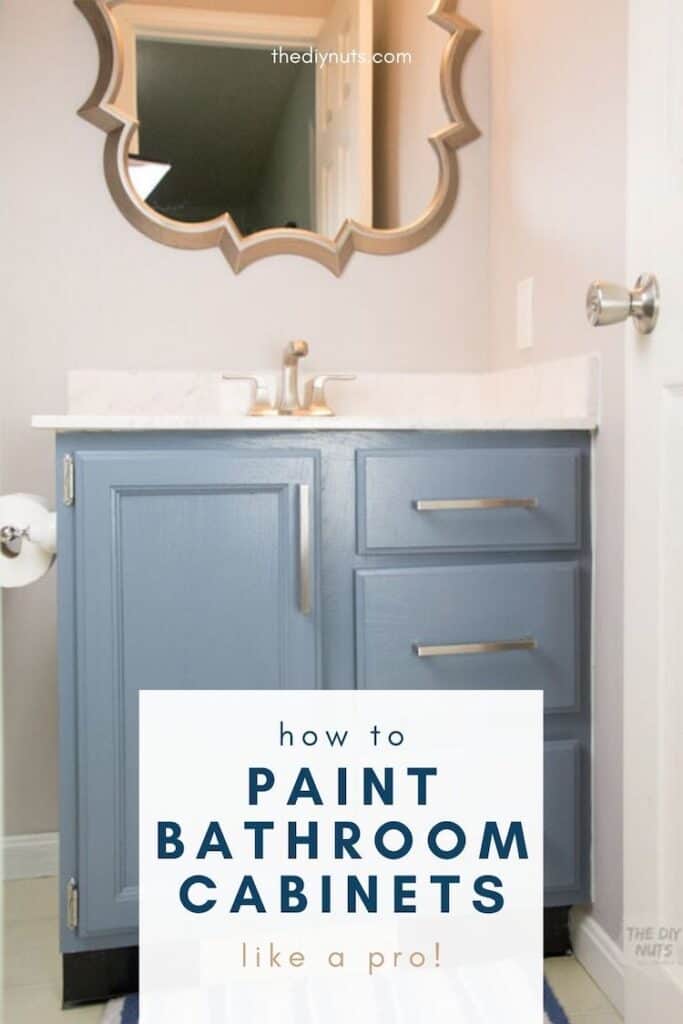
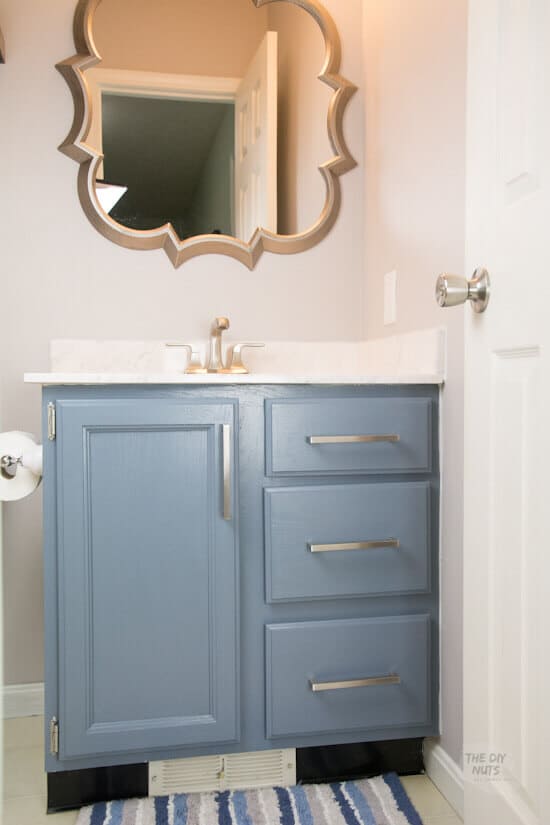
The after bathroom cabinet makeover
Painting our bathroom vanity was one of the best and cheapest ways to refresh our small bathroom.
From the Charcoal Blue cabinets to our SW Grayish walls we love how the bathroom came out. The only thing we need to do is spray that vent black! (Thanks for the comment and suggestion from one of our readers).
What other tips do you have for painting a bathroom vanity? We would love to hear about your DIY projects!
Read more: Check out 13+ other DIY projects where we have finally gotten rid of most of the honey oak in our home!
Follow us on Pinterest or Facebook for more DIY inspiration!
The only way to truly experience the feeling of a dry towel after every shower is to take one off a Bathroom Butler heated towel rack. Experience the difference and ensure fresh, dry and hygienic towels all year round.
EXPLORE HEATED TOWEL RACKS
OUR HEATED TOWEL RACK COLLECTIONS.
Each of our collections has its own distinct appearance, adding a unique look and feel to the bathroom space that speaks to the individual's style and taste.
Bathroom life without a heated towel rack.
Excess Laundry
Because of the bacterial build-up on used both towels, experts advice that they should be washed every day which results in excess laundry.
Unhygienic Towels
Used towels develop an unpleasent, musty odour due to the bacteria that build-up on surface.
Unorganized Spaces
Cluttered and unorganized space can be an eyesore, especially in the bathroom where we aim to create a tranquil enviroment.
ONCE YOU'VE HAD A HEATED TOWEL RACK, YOU WON'T BE ABLE TO LIVE WITHOUT IT.
Hygienic Towels
In order to prevent bacteria build-up, towels need to be dried properly after each use. Our heated towel rails do just that, drying your towels effectively thereby reducing the bacteria by up to 90%.
Less Laundry
Heated towel racks are specially designed to keep your bath towels dry, clean and fresh, meaning they require less frequent washing which ultimately results in less laundry.
Organized Spaces
Heated towel rails not only dry your towels but also provide an attractive storage solution for your damp bath towels. The distinctive design offers an appealing feature to the bathroom which also caters to small and narrow spaces.
Space Saving
When you think bathroom towel storage, a heated towel rack is the best choice. It dominates in the good looks department and it is a better use of space. It is able to store and efficiently dry more towels than a traditional non-heated towel rail even in small and narrow bathrooms. With the average width of a heated towel rack being 500mm or 20 inches, any bathroom space can accommodate one of these beauties.
THE PURPOSE OF A HEATED TOWEL RACK.
Many are surprised to learn that heated towel rails don't exist to warm up towels. Sure, they'll add a luxurious touch of warmth but their actual job, something they do brilliantly is TO DRY TOWELS, not heat them up.
Which is important because dry towels will have up to 90% LESS BACTERIAL BUILD-UP, making them more hygienic and fresher between washes.
Hygiene aside, THE DELICIOUS FEELING of a dry towel every morning is most definitely the best bonus!
Our heated towel racks use the best kind of tech, Dry Element Technology (DET) meaning they heat up via a special purpose wire and reach optimal temperature in as little as 15 minutes. And because of their ability to control the temperature, they can get down to the business of drying your towels in a flash. When you place a towel over the horizontal heated bars, there will be an increase in temperature under the towel, but the exposed surfaces will remain cool to the touch, which is a smarter and a safer way to go.
THE BATHROOM BUTLER DIFFERENCE.
Dual Entry
Advanced Technology
Dry Element Technology
Rapid Heating
Personal Temperature Selection (PTS) Switch
Grade 304 Stainless Steel
There are heated towel racks and there's a Bathroom Butler. We make our products with an exceptional level of care. From the packaging and how we test our products to using one of the top grades stainless steel material in combination with the flawless design, meticulous engineering and advanced DET technology. Every little detail is well considered and we are passionate about bringing you the best heated towel rails possible.
Find out why the Bathroom Butler Heated Towel Racks are SIMPLY THE BEST.
Bathroom Butler heated towel racks use Dry Element Technology or DET which ensures quicker heat up times, reaching optimum working temperature within 10 minutes. With the wattage of the most popular heated towel rack being 60 Watts or the same as a standard incandescent light bulb, they don't cost much to run either.